Wednesday, February 1, 2017

Simple Craft for Kids Who Love Stickers! Ages 2-5

Teaching scissor skills at home is a great way to have fun with very young children and is a healthy for their growth and development. These are skills they will be learning in pre school and kindergarten so give them a head start while spending time together.
We started off with a sheet of paper. I had a stack of sticker sheets with various sized stickers. I gave her only one at a time. She wanted to cluster them together so I made suggestions about where to place them so they would be spaced apart.

Before she got too many on the sheet I placed scissors on the table next to her and she didn't need instructions, she just started cutting and I encouraged her to keep going.

I expected her to cut them out with a large boarders but she surprised me and carefully trimmed many of the stickers. I let her do as she pleased.

All the while I asked her to put all the cut pieces and stickers into a container.

Then I let her mix it up. After she got her fill of that I played a game with her by asking her to find a certain sticker.

While she played in the container I made this strip and marked on the lines. When she was ready I asked her to cut on the lines and add the stickers to her box.

She did so well following the lines I made a second strip with more challenging lines.

Then we played the game again. After a while she pretended to be mixing up food for cooking.

Cutting out stickers is an activity I have done with all three of my children at age 2. Each one loved doing this. Older children can do this too and it can be an opportunity to practice so many skills. You could count the stickers, you could sort the stickers, or use stickers related to a topic you'd like to talk about such as understanding the four seasons of the year.


For best results:

Children (at least mine) seem to cut better while standing, so I position them at a table. We have a child sized table in our classroom/craft room but a coffee table would be a good height.

For a beginning cutter, do not use thin paper, it's difficult to cut. Construction paper on the other hand takes to much muscle. The best paper to use is copy paper from your printer.

I start my kids using scissors at age 2, and I skip the safety scissors designed to prevent nicks because they are too blunt to cut causing frustrations. A child might nick themselves but they won't bleed to death and it has never deterred my kids from crafting.

And here is a little peak at how I store my  stickers. I use stickers for so many things with the kids and I buy way too many. I have them organized and grouped in sheet protecters in three ring binders.


Where I get my supplies:

The Dollar Tree is a great source for cute affordable paper.

I buy my scissors from the Dollar Tree year round and from Walmart at the beginning of school season when everything is at a good price. I like to pay .50 - $1 each for kid size scissors. The scissors used in the photos were a 2pk for $1 at Dollar Tree I picked up just last weekend and are great.

The Dollar Tree is also great for buying stickers. No where else have I found stickers for such a great price let alone the variety. You can score $1 holiday sticker booklets from the Target Dollar section on sale for 50℅ - 75% off end of season. Same thing at Michael's and Hobby Lobby.

Wednesday, January 25, 2017

Fun Easy, Educational; Color Sorting Activity for Age 2-4

I've started doing some more structured activities with Ella, who is 2 1/2 yrs. She is more than ready for these kinds of focused, sit down activities.

Ella is at about 75% with here colors. So I wanted to do something fun that would reinforced her color identification and help her see the variety of each color.

She decided to decorate "box" out of a egg carton from the recycle material box and I capitalized on the opportunity for a popular sorting activity done with pom poms.

Once she was finished decorating the outside, I suggested she fill it up and I had just the thing to fill it with. She was excited.

I grabbed some solid color stickers  and my big box of pom poms and we were ready to begin.

I gave her a sticker, helped her identify it's color, and had her place it in a section. Then I grabbed a pom pom and announced that it was also that color and placed it in. I asked her if there were any more and let her do it.
I waited for her to suggest that we add the feathers too, and encouraged her idea.
While she worked, I snuck away and hunted through my stickers. I choose these Sesame Street stickers to add based on their easy colors. I casually set them on the table beside her and let her get the idea to add them.
And lastly I grabbed a bowl of random items that I have on the shelf. When I see craft items on the floor I toss them into this bowl until I have time to put it away... It's my "junk bowl"😜. Again, I set it down but let her decide to add them.


This activity was a big success, it was a fun time spent together with my daughter and I could see strong skill improvement through the activity.

This is something that is best done together but with an older child who has experience with this activity, it could be an independent quite time or table activity 


I want to say that this activity did not work with either of my two older boys at any age. That's okay, this is an activity that many children will love but if they can not sit still or focus just abandoned the sorting part of the activity and let them play with the pom poms and decorate the box while you point out the colors. This reminds me of this quote:

This is a valuable activity because it not only teaches colors but also a very important early math skill of sorting and compairing. In addition to that it improves fine motor skills, grasping and coordinating. If your child is like my boys, don't worry, they are still learning just manipulating the pom poms and from hearing you use color names.

Tuesday, January 24, 2017

Fast Easy DIY Wild Kratts Creature Power Suits, No Sew!

Today Emmitt wanted to do some dramatic play with his favorite show, Wild Kratts. I decided to spruce up the two power suits I made a few years ago by adding the creature disks like in the show. I also needed to make a thrift suit for Ella, who is now a huge fan like her brother's.

I printed  on card stock the creature disks available from PBS website here and cut them out.

I used my laminator to laminate them and saved the extra plastic I cut off for a later step. If you don't have a laminator use clear packing tape on both sides to create a protective layer. I will link my laminator at the end of this post.


Now you are ready to make the suit. I use fleece because it doesn't unravel, no hem is necessary. You can get a yard from the store, or cut up on old fleece throw.

I can technically sew, but it's not a strength of mine and neither is measuring or following patterns. So I just eye ball and free style this kind of stuff 😁.

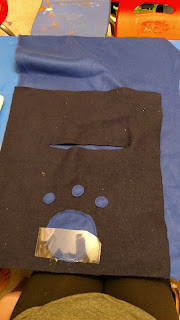
I cut a rectangle to make a very basic best, size it to fit your kid. You want at least 5 inches to fall behind the shoulders for stability and make the from the length of their shirt. I cut a wide slit for the neck.

Here you can see the original I made, and I'm using it as a template to cut a new one.

Next I cut out a circle, I used a lid to trace the shape. It's about 4" in diameter.
Then I cut out three more. I used a quarter to help me draw a circle, but it's larger than the quarter, I'm guessing about 1 1/2" in diameter.


Then I used hot glue around the edge to glue them together. The glue bonds great, it's best to get the glue close the the edge as possible and press down to get a good stick.
The last step is I took the extra plastic from laminating the disks and managed to cut out a desent sized rectangle. I glued the bottom and side edges to make a clear pouch for the disks.

And DONE! It took me 20 minutes to made the disks, add punches to the two existing suits, and creat a third suit from scratch.


I got inspired for these from Mom Endeavors blog post here, but she does hers different, so check it out.

I love my laminator,  I got it on sale from Amazon, and the laminating sheets also on sale from the Amazon Basics line. I paid $10 for my laminator (sale!) And I like to pay about $9 per 100 for 3mil laminating sheets. Shop around on Amazon because their prices are constantly changing.

I like to buy my card stock and colored printer paper from Walmart at the beginning of the school year when all the prices are the best.

Monday, January 23, 2017

Emmitts Second and Third Week Learning to Read.

Our first week went so well, Emmitt is very excited and determined to learn to read. Although this excitement and determination hasn't changed, our second week and third week didn't go near as well.

This past 2 weeks Emmitt did not want to work on school. I was able to get him working on the Bob app for a short time only twice and no other work was done. It's difficult for me not to be disappointed, but there are a few things I am reminding myself today.

First is that this is a process. Rome wasn't built in a day nor is a daily home school routine. This is the first time I have attempted a regular schedule with Emmitt. Although Easton, my oldest, thrives on structure and routine, Emmitt needs flexibility. It will take time for us to find the sweet spot for Emmitts home school routine.

Second is that this is only a paragraph in a much larger story. Emmitt has unique needs, as I briefly mentioned in my week one post. As I reflect I feel that Emmitt oftentimes needs a break after a high sensory or high intensity experience. He needs time to process and come back to a balanced place. It was a big deal beginning our reading journey and an exciting arcade night reward his proud father gifted him and it's probable that Emmitt needed some time to digest and bring his stress level back to normal.

In this phase of reading I have been taught it's best not to take a break from daily sight words, and push through frustrations until the big ahha moment.  But Emmitts needs are his needs, and they need to be met more than he needs to read. It is only a few weeks in a greater experience, and only one experience in a life journey. I am remembering that one or two weeks doesn't mean he wouldn't learn to read and if it takes him longer to learn, than so what; it took him longer.

So I would be lying if I said I wasn't frustrated and struggling to put on my happy face.  But it's not easy being Mom with a special needs child, because Emmitt needs me to sort through these things he is not yet able. He needs my flexibility, needs me to see the needs he can not express, he needs my happy face. He needs to see I believe in him. And I do.

So I am very encouraged to see we are starting week four with a self initiated phonics and sight words activity. I think he is ready to jump back in.


So as a final word I would like to say that I stuck to my guns this past 2 weeks and did not express anger or disappointment when Emmitt refused school time. I offered frequently different activities and neutrality explained why be needed to do some school work. I offered options such as alternative reading activities or doing it at a later time. The answer was always no, so I respected his decision and let it go. Each day I tried again. Emmitt choose to do lots of free time art instead and made some seriously amazing pieces.

I strongly believe that this approach to my special needs child is best for his unique needs. It provides a safe space for him to learn and grow. It would not be the best approach for my other two children, who respond better to a more structured environment (for example, I wouldn't let Easton take a week off school whenever he felt like it, or he would just take advantage!). But that's okay! I try my best to give each child what they need to succeed, even when it means they need different things. It can cause jealously sometimes (my oldest really struggles with jealously), but I help them deal with those feelings when they arise and am careful to show each child they are loved, appreciated, and that I will always be there for them.

Wednesday, January 18, 2017

A Busy Bag! Easy to Make, for Ages 2-5

Here is a simple busy bag I threw together last minute for Ella to take to the restaurant tonight.
Ella loves to carry a bag or purse everywhere she goes, so I skipped the Ziploc and choose this bag instead. 
This isn't just for girls, my boys love to carry bags too.


Here is the contents, 2 chenille stems (pipe cleaners), a popsicle stick, and a tupperware of big hole beads. The beads go onto the stems and the stems can be wrapped around the stick in various ways.
Everything here (or similar item) can be purchased from the Dollar Tree, including the tupperware.
This bag occupied Ella (2 1/2 yrs) before and after her meal. Here she is wrapping a beaded chenille stem around the stick and she then had fun pretending it was a popsicle.

Emmitt (5 yrs) made himself a similar bag after seeing me put Ella's together and added a roll of washi tape to it. He grabed a robot lunch bag to carry his in. He made his into a character from one of his computer games.

Ella has a bag addiction and I have an eBay addiction so here is where it collides.
Ta-da!!!
Yes, twenty three cents and free shipping.

I purchase a good portion of my craft supplies and the kids craft supplies (and general junk) from eBay international sellers.

I will do a post on what and how you can buy craft supplies from eBay international sellers.


Tuesday, January 17, 2017

Spirograph Cyclex, Something New!

So the kids love making spirograph art at the kitchen table when I am cooking or we need to wait patiently until it's time to scoot out the door. Here is something new I picked up with their Christmas money.

One thing I like about it is it is just one piece so it's easier to clean up and keep together than the traditional kind with the loose gears.

It took a little getting used to but now I see the kids are pumping out cool designs with no trouble. Emmitt is 5 and still learning a proper pencil grip and he is able to manipulate it with a little effort.


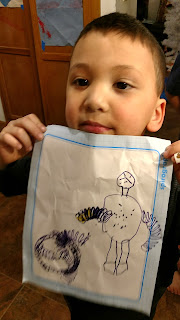
Here Emmitt turned two partial circles into arm's for a person. 🤗

 Here you can see the box of gel pens I keep in the living room along with a pad of paper and a coloring book.

I encourage the kids to get creative like Emmitt did by turning his into a person. A great way to foster this is to make a picture yourself and turn your circles into a flower garden, it will open up the possibilities for them. 

Let me say that I don't like to tell the kids how to make their art, other than practical suggestions like "did you want you person to have arm's?". For example, I wouldn't tell them to turn their circles into flowers. I would never lean over them and tell them their doing it wrong.  I instead make my own thing and share it with them. They see my work and get their own ideas. Sometimes they copy, and sometimes they do something completely different with it.  It's okay if they deviate from the target activity, as long as they are creating and learn to manipulate the materials. Another thing is that I always show pride in my work as an example to them to be proud of their own and that art is important. 

Making kids art is a blast guys. You should definitely try it if you don't already!

I keep only one activity out in the upstairs at a time (which is the spirograph/gel pens) to save me from too much mess. I do keep one or two activities put away in dinning room but the kids need permission to get them out. The rest is kept downstairs in my craft room/classroom or the play room. Needless to say my downstairs is always a wreak, but I try to keep the upstairs as the tidy, presentable spot in my house. Yeah, I try. 😁


During this activity, Easton was in the classroom working with his washi tape and Ella was coloring her color book, coloring things she shouldn't, and clinging to my leg while I cooked (I need to and am cooking up some busy bags for her!). 


You can find this at Walmart, Target, Michael's, and Hobby Lobby for 14.99 to 19.99 but Amazon.com has the best price right now.

The gels pens are great and I got them from Amazon and the Dollar Tree.

Friday, January 13, 2017

Chenille Stem / Pipe Cleaner Sculptures

This craft was entirely created by Emmitt. He decided to get out the chenille stems while hubby and I watched a movie last night and picked it back up today. Easton joined in and made his own thing. Since Emmitt was creating trees I suggested he get some cardboard and make a scene.

Ella was simply not interested so I got out some paint sticks for her.

You'll see the kids using the craft room/classroom for this activity. This is where we keep our supplies and do most of our crafting.
Look at this mess! 😲

Here is Emmitt digging in the "recycle materials box" I keep boxes, tubes, old chop sticks, and anything else in here.
Emmitts finished work. He placed a person climbing in the tree.

Easton's face, he had fun demonstrating the sound his face was making...😵

Ella doing her own thing with the paint sticks.


I like to buy my chenille stems for about 20 for $1, usually from the Dollar Tree or on sale at Hobby Lobby. The huge quantity I have at the moment came from a yard sale last summer (score!).

Here are the paint sticks Ella is using:
Instant educa solid poster paints